How to Make Mason Jar Candles
This week I’m celebrating Scents of the Season with some of my fellow bloggers! Each day we’re sharing a DIY project that celebrates the wonderful aromas of autumn, and I’m excited to share how to make mason jar candles! I have always wanted to make candles but truth be told, I was a big chicken about it. I thought it would be difficult and messy, but it was surprisingly easy and I can’t wait to make more! Following are the instructions for making your own mason jar candles.
 If you’ve been nervous to try your hand at candle making … don’t be!
I promise you it’s really not that difficult and the results are rewarding.

Total cost of supplies was just under $20 – and I have leftover dye and wicks.

Allow the wax to completely melt over medium to medium high heat, until it reaches 180 degrees Fahrenheit.
Tip: Be sure to use a thermometer when making your candles.

Since I was using a cinnamon scent, I added red dye with a little bit of gold dye mixed in.
Allow the dyed wax to cool to 175 degrees and add scented oil, about .5 ounce for 2 lbs of wax. Mix well.
(Note: I like heavily scented candles and will probably double the dosage of scented oil next time.)

Wrap the top of the wick around a bamboo skewer or toothpick to hold the wick in place.
This will come in handy when you start pouring the wax and allows you to reposition, if needed.

Leave room at the top of the jar so the wick extends above the wax but can be trimmed below the rim.
Tip: Place waxed or parchment paper under your mason jars to catch any spills.

Poke holes near the wick to allow air bubbles to escape.

Remember to leave space at the top of the jar for the wick to extend above the wax after trimming.
Allow candles to cool completely – about 6 hours – then trim the wicks.

Even the clean-up process wasn’t too bad. The cinnamon scent reminds me of Fall!

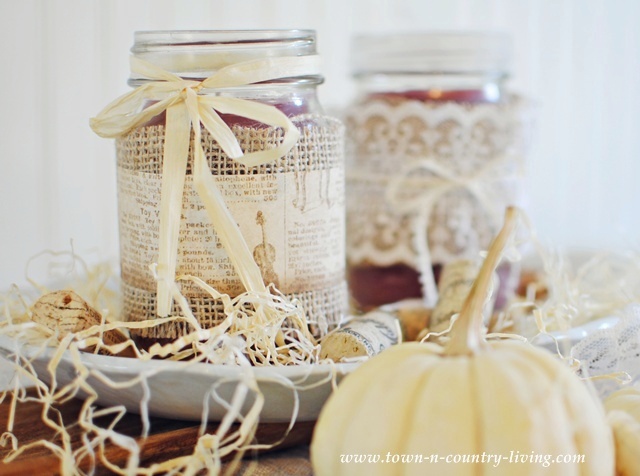
And I hope you’ll give it a try. The candles make great gifts!
Here’s the schedule for this week’s Scents of the Season:
Monday
Deja Vue Designs
My Soulful Home
Tuesday
Cupcakes and Crinoline
Town and Country Living
Wednesday
White Lace Cottage
Our Southern Home
Thursday
Shabby Art Boutique
Mrs. Hines’ Class
Friday
House on the Way
Pet Scribbles
Lilacs & Longhorns
AND … starting later this week is the Fall Vignettes How-To Tour with 25 bloggers!
I’ll share how to create a centerpiece this Saturday, November 9th.
Sharing this post at Wow Us Wednesday, Metamorphosis Monday




love this, jennifer:) great xmas idea!
Great Tutorial Jennifer! I love candles…and they’re even better in your beautiful jars! Thanks for sharing…So glad to be on the Scents Tour with you! ~Tammy
Just wondering if you can get the wax out of the pot you melted it in? Or is the pot now a designated candle melting pot? Thanks!
Jen,
What a great Christmas gift idea. I bet your home smells so good with making these candles. Thanks for showing us how to make these lovelies.
Kris
I am soooooooooooooo doing this! I love the look of candles in Mason jars and I love how you dressed yours up!
Jeanine
They look amazing Jennifer and always fun to make your own candles too. Great scent of the season!
Wow! These do look simple! What a great Christmas gift! My daughter and I will give these a try! Quick questions….was it a candy thermometer that you used and what size mason jar? Do craft stores sell these supplies or do you buy online! Can you tell that I’m excited!! ~Christy
And they are sooooo pretty! You made this look so easy. Great tutorial!
Your candles look so pretty Jennifer and I bet they smell amazing.Where did you buy all of your supplies?I am thinking I will just pick up a pot to use for melting the wax.They are pretty cheap at thrift shops.
Thank you for sharing!
Pinning!
What a great scent of the season. I love candles during this time of year. The embellishments are so pretty.
Cynthia
I have always wanted to make candles but never have ~ you have inspired me! I love the way you displayed them as well ~ you have such a talent for making things look beautiful.
I love your beautiful candles. Those will make super Christmas gifts.
Candles really do a lot to give a home that special feel. Thanks for sharing this great tutorial!
I also thought making candles would be messy, hard etc. Your DIY belies those thoughts. Will try it. Making your roasted tomato soup from the LCI post as I type! Yummy!!
This would make a wonderful gift!!! I love this idea! Pinning!
Oh I bet your home smells so wonderful! I love the idea of making candles but haven’t had much luck. Some reason the wick would never stay upright after lighting. Once I tried the gel candle in peppermint for gifts. I bought those wax peppermint candies to imbed in it. They melted and looked like the candy from the bottom of grandmas purse! Like I said no luck here :(. A few tips. If you don’t want to ruin/clean a pot use a empty food can. You can save on used wax in it or just throw it away. Please make sure it is scented oil made for candles. Most oils are flammable. Using the wrong one wouldn’t be pretty.
Excellent idea to use old tin can! I will also suggest that instead of wasting a good mason jar, just use other glass jars with metal lids. The more unique, the more interesting they will be! Try old store-bought jelly jars, spaghetti sauce jars, pickle jars!
Thanks for sharing these directions!! Most of the instructions on the back of most candle-making supplies lack this type of detail so it was great to refer to your blog when I was making these (for Christmas gifts as Kris, Christy, and Dee all suggested).
I followed these directions, but used large empty aluminum cans to melt the wax, less cleaning a the end, and I was able to make a variety of colors and scents at the same time).
One tip I would add would be to save a 1/4 cup of wax per candle AFTER following all these steps since after cooling overnight the center of my candles sunk DRAMATICALLY (even after filling in the center once).
I had luckily made a smaller “extra wax” candles that I was able to use this time but in the future I’m gonna make sure to set some aside for filling in the center the morning after.
Where did you get your supplies from? And what kind of wax is it?
Another suggestion…if you pour the candle wax too hot you will get sinkage in the middle. This is because the wax contracts as it cools and leaves voids. The voids can cause the candle to smoke. A tip is to overfill slightly and then use a heat gun to melt some of the top layer of wax to melt down and fill the holes. You may need to repeat this process several times.
You can get supplies from places like Michaels or many online stores. Wax is determined by what kind of candle you are making but a say/parrafin been is the easiest to work with and has the best throw IMO.
Jennifer – Looks like your post was a couple years back now, but what a great one! I wish I had stumbled upon your Mason jar candle making prior to creating our candles even! You’ve got great creativity. Would love to get your feedback on our candles… any recommendations for how to dress the jar? http://masonjarcandles.org/
Just wondering how much wax did you have to melt to make 4 manson jar
Gorgeous! Just love these xx
Beautiful candles, they look great. Cinnamon is a fantastic fall and winter fragrance. Reminds me of walking into a warm house on a cold day.